


 点击刷新
点击刷新

一、理解DOM
DOM:文档对象模型(Document Object Model)
● 简称 DOM,将页面所有的内容表示为可以修改的对象
BOM:浏览器对象模型(Browser Object Model)
● 简称 BOM,由浏览器提供的用于处理文档(document)之外的所有内容的其他对象
● 比如navigator、location、history等对象
浏览器会对我们编写的HTML、CSS进行渲染,同时它又要考虑我们可能会通过JavaScript来对其进行操作
● 浏览器将我们编写在HTML中的每一个元素(Element)都抽象成了一个个对象
● 所有这些对象都可以通过JavaScript来对其进行访问,可以通过JavaScript来操作页面
● 这个抽象过程称之为 文档对象模型(Document Object Model)
整个文档被抽象到 document 对象中
● 比如document.documentElement对应的是html元素
● 比如document.body对应的是body元素
● 比如document.head对应的是head元素
tip : documentElement、body、head等都是document的属性,但是我们自己创建的元素就不是,所以不能直接获取
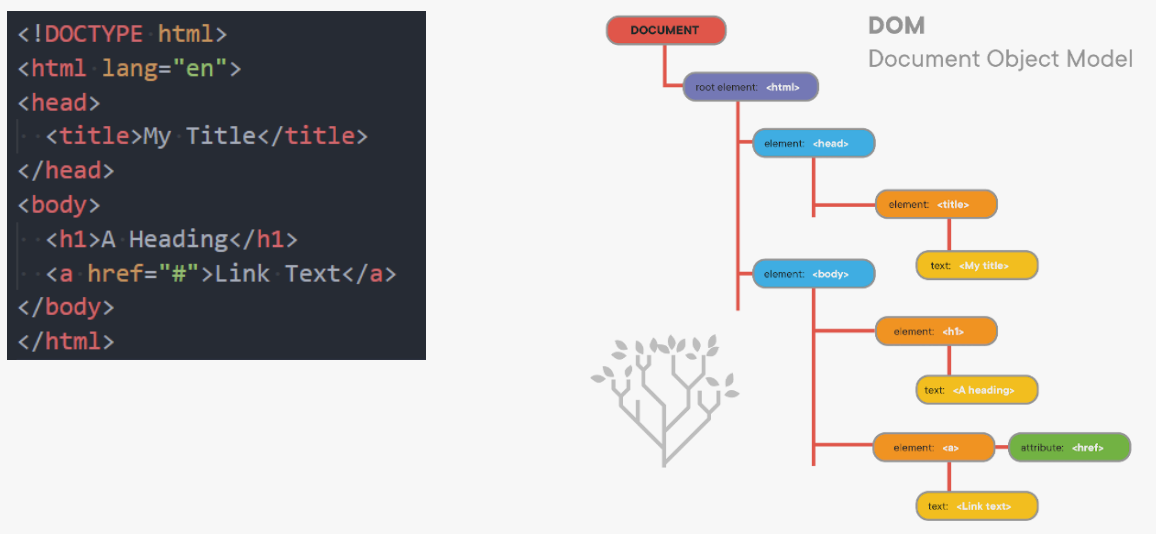
二、DOM Tree
一个页面不只是有html、head、body元素,也包括很多的子元素:
● 在html结构中,最终会形成一个树结构
● 在抽象成DOM对象的时候,它们也会形成一个树结构,我们称之为DOM Tree
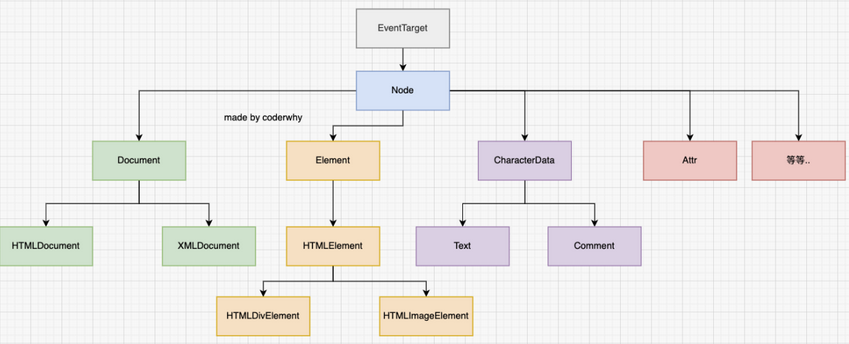
三、DOM的继承关系图
DOM相当于是JavaScript和HTML、CSS之间的桥梁
● 通过浏览器提供给我们的DOM API,可以对元素以及其中的内容做任何事情
类型之间有如下的继承关系 :
四、document对象
Document节点表示的整个载入的网页,它的实例是全局的document对象:
● 对DOM的所有操作都是从 document 对象开始的
● 是DOM的 入口点,可以从document开始去访问任何节点元素
对于最顶层的html、head、body元素,我们可以直接在document对象中获取到
● html元素:<html > = document.documentElement
● body元素:<body > = document.body
● head元素:<head > = document.head
● 文档声明:<!DOCTYPE html > = document.doctype
    <script>
      const htmlEl = document.documentElement
      const bodyEl = document.body
      const headEl = document.head
      const doctype = document.doctype
      console.log(htmlEl, bodyEl, headEl, doctype)
    </script>
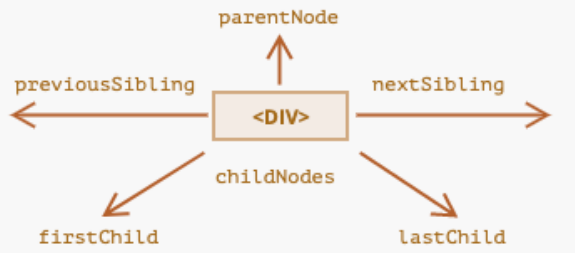
五、节点(Node)之间的导航(navigator)
获取到一个节点(Node)后,可以根据这个节点去获取其他的节点,这称之为节点之间的导航
节点包括了 : 元素、文本、注释等等,所有的都在节点里
节点之间存在如下的关系:
● 父节点:parentNode
● 前兄弟节点:previousSibling
● 后兄弟节点:nextSibling
● 子节点:childNodes
● 第一个子节点:firstChild
● 第二个子节点:lastChild
栗子
      <body>
        <!-- 我是注释, 哈哈哈 -->
        我是文本, 呵呵呵
        <div class="box">哈哈哈哈哈</div>
        <ul>
          <li>1</li>
          <li>2</li>
          <li>3</li>
          <li>4</li>
          <li>5</li>
        </ul>
        <script>
          // 获取body元素
          const bodyEl = document.body;
          // 1.获取body所有的子节点
          console.log(bodyEl.childNodes); // [ text、comment、text、div.box、text、ul、text、script]
          // 2.获取body的第一个子节点
          const bodyElFirstChild = bodyEl.firstChild;
          console.log(bodyElFirstChild);
          // 3.获取body中的注释
          const bodyElCommentChild = bodyElFirstChild.nextSibling;
          console.log(bodyElCommentChild);
          // 4.获取body的父节点
          const bodyParent = bodyEl.parentNode;
          console.log(bodyParent);
        </script>
      </body>
说明

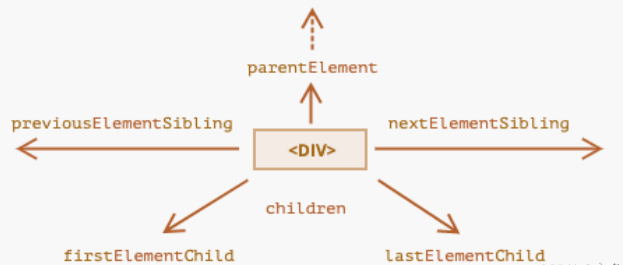
六、元素(Element)之间的导航(navigator)
获取到一个元素(Element)后,可以根据这个元素去获取其他的元素,这称之为元素之间的导航。
元素包括了 : 元素!!! 没有其他杂七杂八的东西,我们常用的就是操作元素
元素之间存在如下的关系 :
● 父元素:parentElement
● 前兄弟元素:previousElementSibling
● 后兄弟元素:nextElementSibling
● 子元素:children
● 第一个子元素:firstElementChild
● 最后一个子元素:lastElementChild
栗子
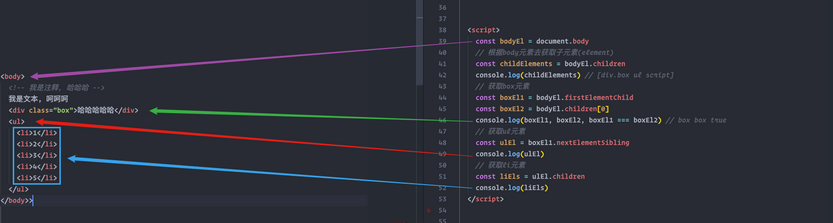
    <body>
      <!-- 我是注释, 哈哈哈 -->
      我是文本, 呵呵呵
      <div class="box">哈哈哈哈哈</div>
      <ul>
        <li>1</li>
        <li>2</li>
        <li>3</li>
        <li>4</li>
        <li>5</li>
      </ul>
      <script>
        const bodyEl = document.body
        // 根据body元素去获取子元素(element)
        const childElements = bodyEl.children
        console.log(childElements) // [div.box ul script]
        // 获取box元素
        const boxEl1 = bodyEl.firstElementChild
        const boxEl2 = bodyEl.children[0]
        console.log(boxEl1, boxEl2, boxEl1 === boxEl2) // box box true
        // 获取ul元素
        const ulEl = boxEl1.nextElementSibling
        console.log(ulEl)
        // 获取li元素
        const liEls = ulEl.children
        console.log(liEls)
      </script>
    </body>
说明
七、获取元素的方法
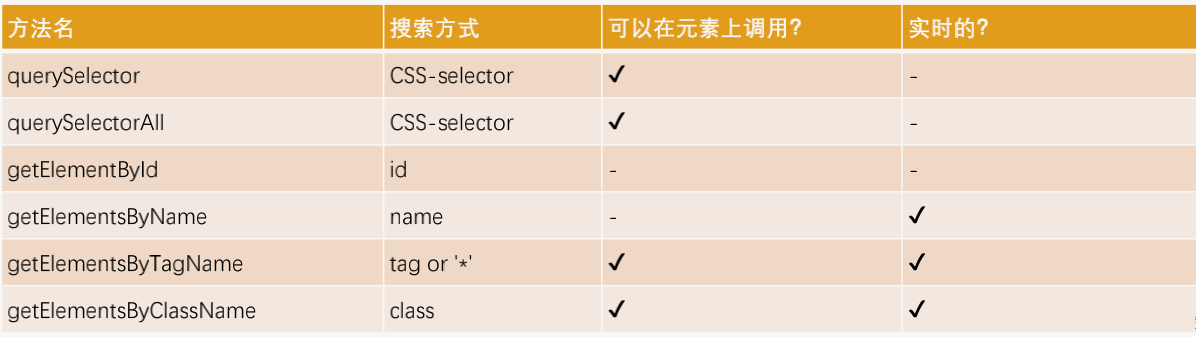
目前最常用的是querySelector和querySelectAll
getElementById偶尔也会使用或者在适配一些低版本浏览器时
      <body>
        <div class="box">
          <h1 id="title">冲啊!!!!!!</h1>
        </div>
        <script>
          const boxDom = document.querySelector('.box');
          const hDom = document.getElementById('title');
          const hDom2 = document.querySelector('#title');
          console.log(boxDom, hDom, hDom2, hDom === hDom2); // true
        </script>
      </body>
八、节点的属性
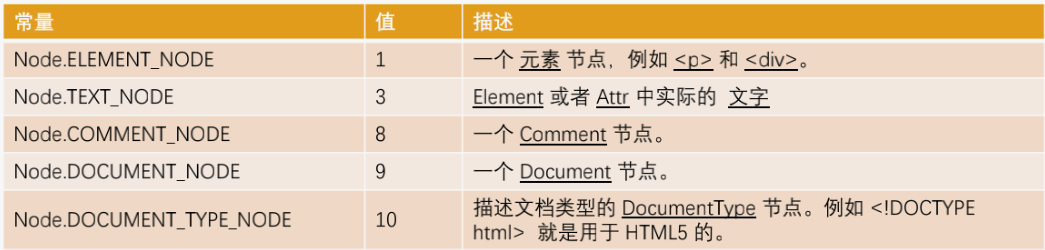
1、nodeType
● nodeType 属性提供了一种获取节点类型的方法
● 是有一个数值型值(numeric value)
      <body>
        <!-- 我是注释, 哈哈哈 -->
        我是文本, 呵呵呵
        <div class="box">哈哈哈哈哈</div>
        <script>
          // 拿到body里所有的节点
          const nodes = document.body.childNodes;
          // 可以使用for...of循环
          for (let ele of nodes) {
            switch (ele.nodeType) {
              // 元素
              case 1:
                console.log('元素', ele);
                break;
              // 文本
              case 3:
                console.log('文本', ele);
                break;
              // 直接使用常量 8 代表注释
              case Node.COMMENT_NODE:
                console.log('注释', ele);
                break;
            }
          }
        </script>
      </body>
2、nodeName、tagName
● nodeName:获取node节点的名字;
● tagName:获取元素的标签名词;
tagName 和 nodeName 的区别 :
● tagName 属性仅适用于 Element 节点;
● nodeName 是为任意 Node 定义的:
----对于元素,它的意义与 tagName 相同,所以使用哪一个都是可以的;
----对于其他节点类型(text,comment 等),它拥有一个对应节点类型的字符串;
     <body>
        <!-- 我是注释, 哈哈哈 -->
        我是文本, 呵呵呵
        <div class="box">哈哈哈哈哈</div>
        <p>我是p</p>
        <script>
          // 拿到body里所有的节点
          const nodes = document.body.childNodes;
          // 可以使用for...of循环
          for (let ele of nodes) {
            switch (ele.nodeName) {
              // DIV
              case 'DIV':
                console.log('元素', ele);
                break;
              // P
              case 'P':
                console.log('元素', ele);
                break;
              // 文本
              case '#text':
                console.log('文本', ele);
                break;
              // 注释
              case '#comment':
                console.log('注释', ele);
                break;
            }
          }
        </script>
      </body>
3、data、innerHtml、outerHTML、textContent
01 - data/nodeValue : 针对非元素的节点获取数据
    <body>
        <!-- 我是注释, 哈哈哈 -->
        我是文本, 呵呵呵
        <div class="box">哈哈哈哈哈</div>
        <p>我是p</p>

        <script>
          const nodes = document.body.childNodes;
          for (const el of nodes) {
            // data针对非元素的节点获取数据
            console.log(el.data); // 我是注释, 哈哈哈  我是文本, 呵呵呵  undefined undefined undefined
          }
        </script>
      </body>
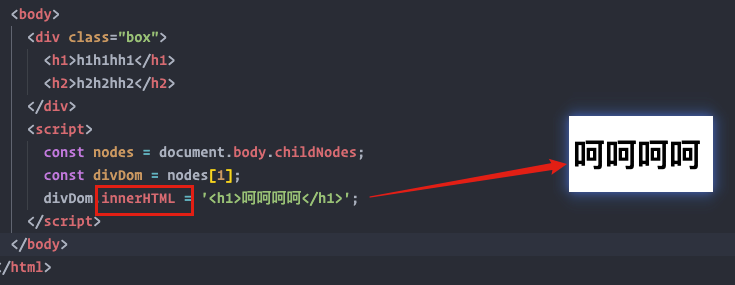
02 - innerHTML : 获取元素内部所有 ( 包括元素标签 )
      <body>
        <div class="box">
          <h1>h1h1hh1</h1>
          <h2>h2h2hh2</h2>
        </div>
        <script>
          const nodes = document.body.childNodes;
          const divDom = nodes[1];
          console.log(divDom.innerHTML); //<h1>h1h1hh1</h1> <h2>h2h2hh2</h2>
        </script>
      </body>
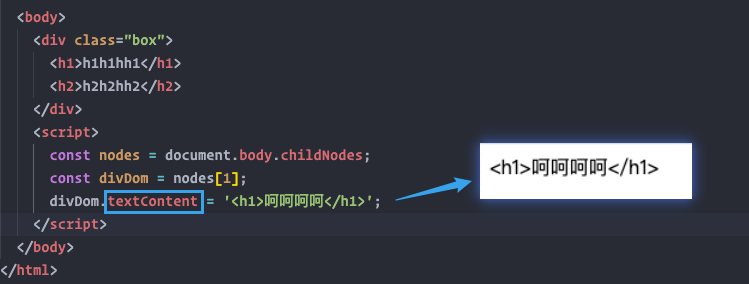
03 - textContent : 仅仅获取元素中的文本内容
      <body>
        <div class="box">
          <h1>h1h1hh1</h1>
          <h2>h2h2hh2</h2>
        </div>
        <script>
          const nodes = document.body.childNodes;
          const divDom = nodes[1];
          console.log(divDom.textContent); // h1h1hh1  h2h2hh2
        </script>
      </body>
04 - innerHTML 和 textContent的区别
除获取时的不同外,设置值的时候也存在区别
● 设置文本, 作用是一样
● 设置文本中包含元素内容, 那么innerHTML浏览器会解析, textContent会当成文本的一部分
innerHTML
textContent
05 - outerHTML: 获取元素内部所有 ( 包括元素标签、包括自己 )
      <body>
        <div class="box">
          <h1>h1h1hh1</h1>
          <h2>h2h2hh2</h2>
        </div>
        <script>
          const nodes = document.body.childNodes;
          const divDom = nodes[1];
          console.log(divDom.outerHTML);
          /**
           *
            <div class="box">
              <h1>h1h1hh1</h1>
              <h2>h2h2hh2</h2>
            </div>
           *
          */
        </script>
      </body>
九、元素Element 之 属性操作
1、attribute的分类

01 - 共有
<body>
<div id="abc" class="box" title="box" age="18" height="1.88">我是box</div>
<input type="checkbox" checked="checked" />
<script>
const boxEl = document.querySelector('.box');
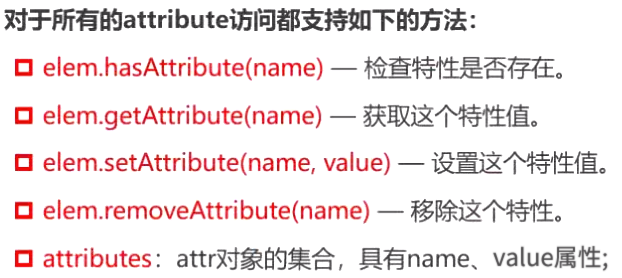
// 1.所有的attribute都支持的操作
console.log(boxEl.hasAttribute('AGE'), boxEl.hasAttribute('abc'), boxEl.hasAttribute('id'));
console.log(boxEl.getAttribute('AGE'), boxEl.getAttribute('abc'), boxEl.getAttribute('id'));
boxEl.setAttribute('id', 'cba');
boxEl.removeAttribute('id');
const boxAttributes = boxEl.attributes;
for (const attr of boxAttributes) {
console.log(attr.name, attr.value);
}
// 2.通过getAttribute()一定是字符串类型
const inputEl = document.querySelector('input');
console.log(inputEl.getAttribute('checked'));
</script>
</body>
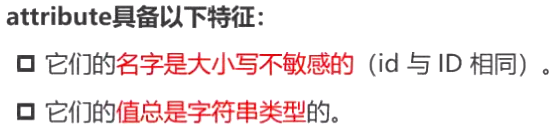
02 - 标准

可以直接通过 . 获取值,获取到的是真实的值,不是字符串了
除非特别情况,大多数情况下,设置、获取attribute,推荐使用这个~~
    <body>
      <input type="checkbox" checked>
      <script>
        const inputEl = document.querySelector("input")
        // 这样获取到的是空字符串,不符合
        if (inputEl.getAttribute("checked")) {
          console.log("checkbox处于选中状态")
        }
        // 这样简便,而且获取到真实的值
        if (inputEl.checked) {
          console.log("checkbox处于选中状态")
        }
      </script>
    </body>
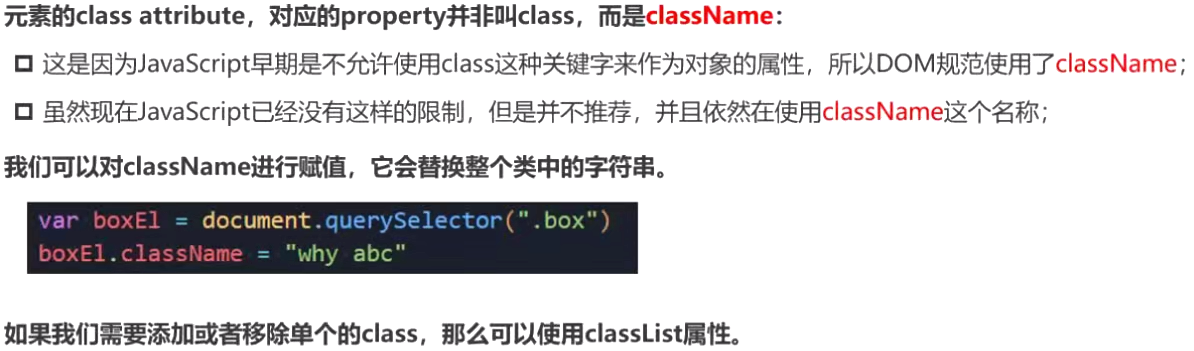
2、attribute 之 class
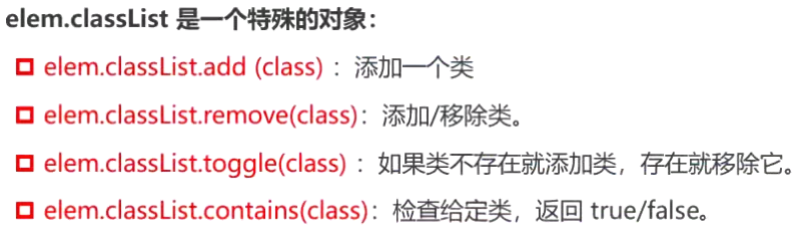
    <body>
      <div class="box">
        我是box
      </div>
      <button class="btn">切换</button>
      <script>
        const boxEl = document.querySelector(".box")
        // 1.方法一: className  直接修改,覆盖类名
        // boxEl.className = "abc"

        // 2.方法二: classList操作class
        boxEl.classList.add("abc")
        boxEl.classList.add("active")
        boxEl.classList.remove("abc")

        // 需求: box在active之间切换
        const btnEl = document.querySelector(".btn")
        btnEl.onclick = function() {
          // if (boxEl.classList.contains("active")) {
          //   boxEl.classList.remove("active")
          // } else {
          //   boxEl.classList.add("active")
          // }
          boxEl.classList.toggle("active")
        }
      </script>
    </body>
3、attribute 之 style
01 - 设置
    <body>
      <div class="box" style="background-color: aqua; color: white;">
        我是box
      </div>
      <script>
        const boxEl = document.querySelector(".box")

        // 1.在property中使用的驼峰格式
        // console.log(boxEl.style.backgroundColor)

        // 2.如果将一个属性的值, 设置为空的字符串, 那么是使用默认值
        // boxEl.style.display = ""
        // 不意味着没有font-size了,变回了默认的16px
        // boxEl.style.fontSize = ""

        // 3.设置多个样式
        // boxEl.style.fontSize = "30px"
        // boxEl.style.color = "red"
        boxEl.style.cssText = "font-size: 30px; color: red;"
      </script>
    </body>
02 - 读取

可以通过内置的 getComputedStyle 全局函数来实现

4、attribute 之 data- *
    <body>
      <div id="abc" class="box" data-age="18" data-height="1.88"></div>
      <script>
        const boxEl = document.querySelector('.box');
        // 可以直接拿到,很有用
        console.log(boxEl.dataset.age);
        console.log(boxEl.dataset.height);
      </script>
    </body>
十、元素Element 之 创建元素
1、创建元素
创建元素 : document.createElement ( tag )
    const h2El = document.createElement("h2")
    h2El.className = "title header"
    h2El.classList.add("active")
    h2El.textContent = "我是标题"
2、插入元素
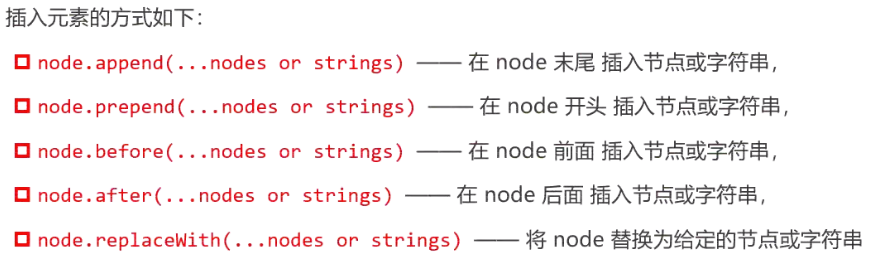
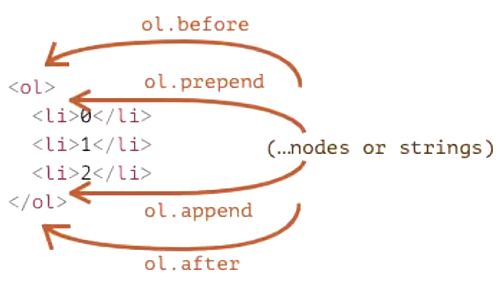
    boxEl.append(h2El)
    boxEl.prepend(h2El)
    boxEl.after(h2El)
    boxEl.before(h2El)
    boxEl.replaceWith(h2El, "abc")
3、移除元素
移除元素 : remove
    const boxEl = document.querySelector(".box")

    // 调用元素本身的方法,移除自己
    boxEl.remove()
4、克隆元素
克隆元素 : cloneNode ( boolean )
● 可以传入boolean类型的值,决定是否需要深度克隆
● 深度克隆会克隆对应元素的子元素,否则不会
    // 克隆元素
    const newNode = boxEl.cloneNode(true)
    // 插入页面
    document.body.append(newNode)
十一、元素Element 之 大小 · 位置 · 滚动
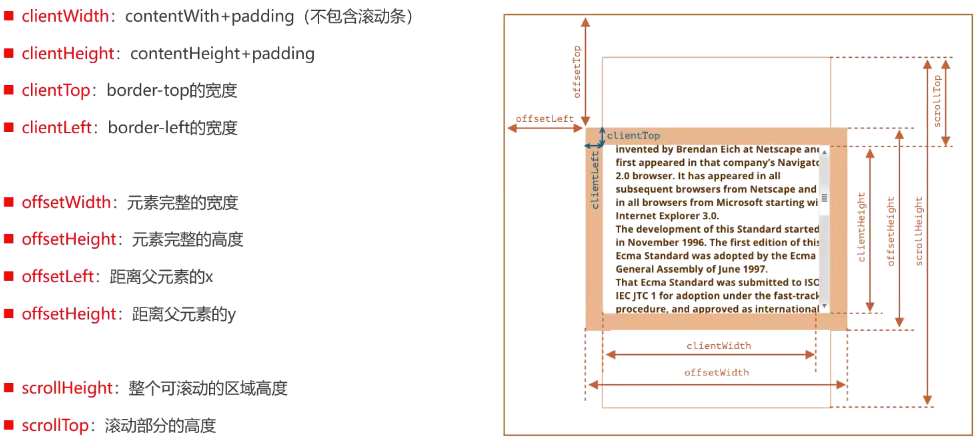
    <!DOCTYPE html>
    <html lang="en">
    <head>
      <meta charset="UTF-8">
      <meta http-equiv="X-UA-Compatible" content="IE=edge">
      <meta name="viewport" content="width=device-width, initial-scale=1.0">
      <title>Document</title>
      <style>
        body {
          padding: 100px;
        }
        .box {
          width: 100px;
          height: 100px;
          padding: 20px;
          border: 10px solid red;
          /* box-sizing: border-box; */
          background-color: orange;
          overflow: auto;
        }
      </style>
    </head>
    <body>
      <div class="box">
        你去过国内最美的地方是哪# 我去过国内最美的地方是新疆喀纳斯。喀纳斯是一个美丽而神秘的地方,这里群山环抱,森林密布,湖水清澈,风景奇特。为国家级5A级景区,国家地质公园,国家森林公园。
      </div>

      <script>
        const boxEl = document.querySelector(".box")

        // 1.获取样式(局限性很强)
        // var boxStyle = getComputedStyle(boxEl)
        // console.log(boxStyle.width, boxStyle.height)

        // 2.获取更多信息
        console.log(boxEl.clientWidth)
        console.log(boxEl.clientHeight)

        console.log(boxEl.clientLeft)
        console.log(boxEl.clientTop)

        console.log(boxEl.offsetWidth)
        console.log(boxEl.offsetHeight)

        console.log(boxEl.offsetLeft)
        console.log(boxEl.offsetTop)

        console.log(boxEl.scrollHeight)
        console.log(boxEl.scrollTop)

        // window对象
        window.onclick = function() {
          console.log(boxEl.scrollTop)
        }
      </script>
    </body>
    </html>
十二、窗口window 之 大小 · 滚动
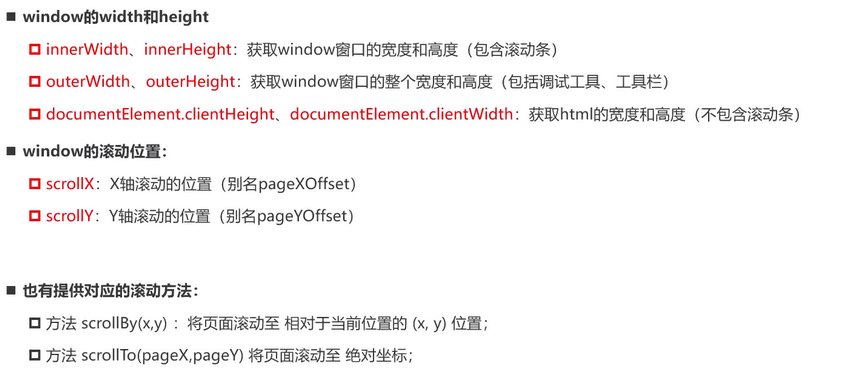
window.scrollTo(x-coord,y-coord)
● x-coord 是文档中的横轴坐标
● y-coord 是文档中的纵轴坐标
window.scrollTo(options)
● top 等同于 y-coord
● left 等同于 x-coord
● behavior 类型String,表示滚动行为,支持参数 smooth(平滑滚动),instant(瞬间滚动),默认值auto,实测效果等同于instant
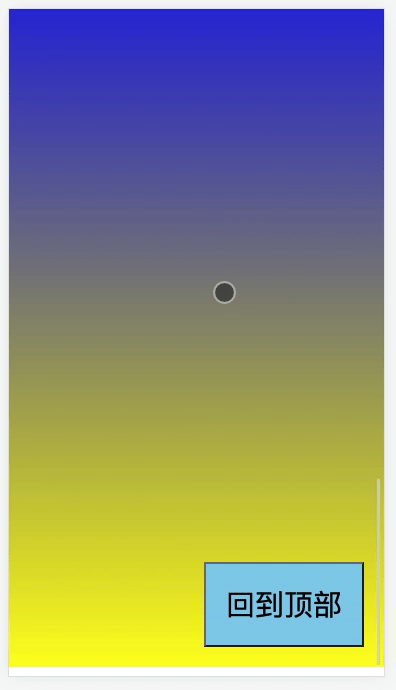
1、栗子
    <!DOCTYPE html>
    <html lang="en">
      <head>
        <meta charset="UTF-8" />
        <meta http-equiv="X-UA-Compatible" content="IE=edge" />
        <meta name="viewport" content="width=device-width, initial-scale=1.0" />
        <title>Document</title>
        <style>
          .box {
            height: 100px;
            background-color: orange;
          }
          .scroll-btn {
            position: fixed;
            right: 20px;
            bottom: 20px;
            /* display: none; */
          }
        </style>
      </head>
      <body>
        <div class="box"></div>
        <button class="scroll-btn">回到顶部</button>
        <br /><br /><br /><br /><br /><br /><br /><br /><br /><br /><br /><br /><br /><br /><br /><br /><br /><br /><br /><br /><br />
        <br /><br /><br /><br /><br /><br /><br /><br /><br /><br /><br /><br /><br /><br /><br /><br /><br /><br /><br /><br /><br />
        <br /><br /><br /><br /><br /><br /><br /><br /><br /><br /><br /><br /><br /><br /><br /><br /><br /><br /><br /><br /><br />
        <br /><br /><br /><br /><br /><br /><br /><br /><br /><br /><br /><br /><br /><br /><br /><br /><br /><br /><br /><br /><br />
        <br /><br /><br /><br /><br /><br /><br /><br /><br /><br /><br /><br /><br /><br /><br /><br /><br /><br /><br /><br /><br />

        <script>
          /**
           * 控制显隐可用display opacity 和 hidden属性
           * 如果要加上动画,使用opacity
           */
          const scrollBtnEl = document.querySelector('.scroll-btn');
          scrollBtnEl.hidden = true;
          window.onscroll = function () {
            let scrollY = window.scrollY;
            if (scrollY > 600) {
              // scrollBtnEl.style.display = "block"
              scrollBtnEl.hidden = false;
            } else {
              // scrollBtnEl.style.display = "none"
              scrollBtnEl.hidden = true;
            }
          };

          // 点击按钮后滚动到某个位置
          scrollBtnEl.onclick = function () {
            // 1. 在原来位置上继续移动
            // window.scrollBy(0, 100)

            // 2. 移动到绝对指定位置,瞬间
            // window.scrollTo(0, 0);

            // 3. 移动到绝对指定位置,滑动
            window.scrollTo({
              top: 0,
              left: 0,
              behavior: 'smooth'
            });
          };
        </script>
      </body>
    </html>
2、效果
十三、事件处理
1、事件监听
● 方式一 : 在script中直接监听 ( 很少使用 )
● 方式二 : DOM属性,通过元素的on来监听事件
● 方式三: 通过EventTarget中的addEventListener来监听
01 - 直接监听
      <!-- 直接在html中编写JavaScript代码(基本不用) -->
      <button onclick="console.log('按钮1发生了点击~');">按钮1</button>
02 - on-*
只能绑定一个事件,否则后面的会覆盖前面的
        const btn2El = document.querySelector(".btn2")

        function handleClick01() {
          console.log("按钮2发生了点击~")
        }
        function handleClick02() {
          console.log("按钮2的第二个处理函数")
        }

        btn2El.onclick = handleClick01
        // 会覆盖
        btn2El.onclick = handleClick02
03 - addEventListener
可绑定多个,不会覆盖
    const btn3El = document.querySelector(".btn3")

    btn3El.addEventListener("click", function() {
      console.log("第一个btn3的事件监听~")
    })
    btn3El.addEventListener("click", function() {
      console.log("第二个btn3的事件监听~")
    })
    btn3El.addEventListener("click", function() {
      console.log("第三个btn3的事件监听~")
    })
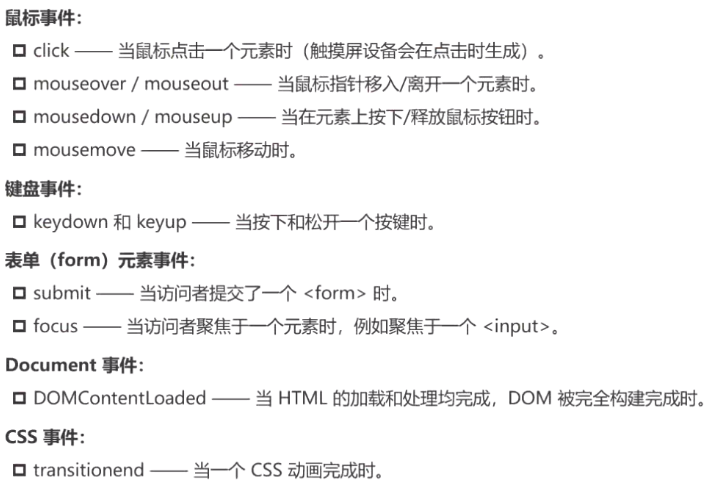
04 - 常见的事件列表
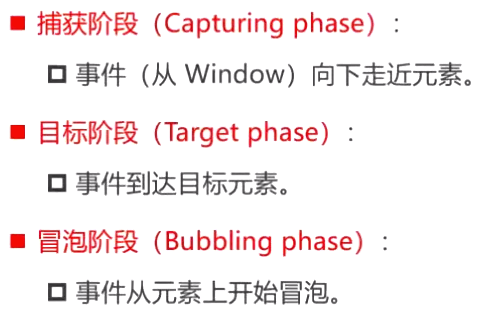
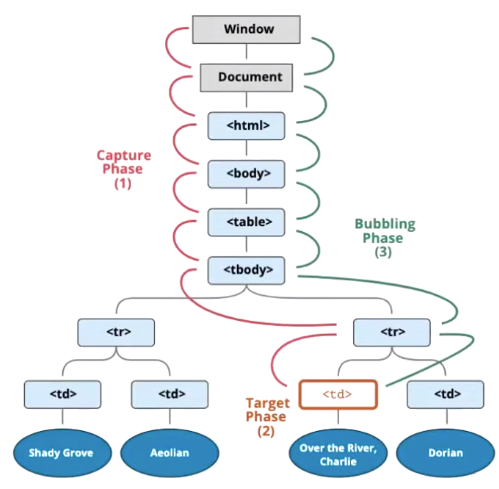
2、事件流
● 对元素点击时,点击的并不仅仅是这个元素的本身
● HTML元素是存在父子元素叠加层级的
● : span放在div上,div放在body上,body放在html上
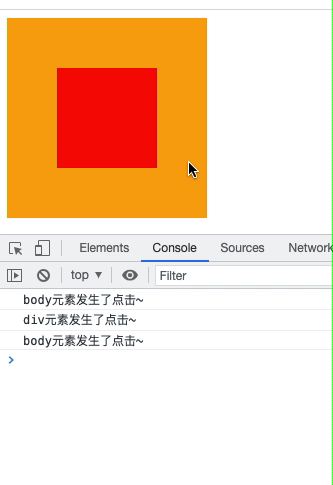
01 - 事件冒泡
事件冒泡 : 从最内层向外依次传递的顺序
栗子
    <!DOCTYPE html>
    <html lang="en">
      <head>
        <meta charset="UTF-8" />
        <meta http-equiv="X-UA-Compatible" content="IE=edge" />
        <meta name="viewport" content="width=device-width, initial-scale=1.0" />
        <title>Document</title>
        <style>
          .box {
            display: flex;
            justify-content: center;
            align-items: center;
            width: 200px;
            height: 200px;
            background-color: orange;
          }

          .box span {
            width: 100px;
            height: 100px;
            background-color: red;
          }
        </style>
      </head>
      <body>
        <div class="box">
          <span></span>
        </div>
        <script>
          // 1.获取元素
          const spanEl = document.querySelector('span');
          const divEl = document.querySelector('div');
          const bodyEl = document.body;

          // 2.绑定点击事件
          spanEl.onclick = function () {
            console.log('span元素发生了点击~');
          };
          divEl.onclick = function () {
            console.log('div元素发生了点击~');
          };
          bodyEl.onclick = function () {
            console.log('body元素发生了点击~');
          };

          // 默认情况下是事件冒泡
          // spanEl.addEventListener("click", function() {
          //   console.log("span元素发生了点击~冒泡")
          // })
          // divEl.addEventListener("click", function() {
          //   console.log("div元素发生了点击~冒泡")
          // })
          // bodyEl.addEventListener("click", function() {
          //   console.log("body元素发生了点击~冒泡")
          // })
        </script>
      </body>
    </html>
效果
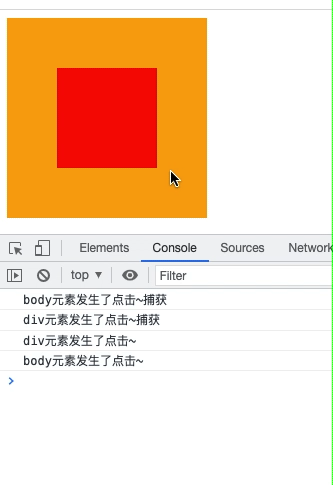
02 - 事件捕获
事件捕获 : 从最外层向内依次传递的顺序
栗子
    <!DOCTYPE html>
    <html lang="en">
      <head>
        <meta charset="UTF-8" />
        <meta http-equiv="X-UA-Compatible" content="IE=edge" />
        <meta name="viewport" content="width=device-width, initial-scale=1.0" />
        <title>Document</title>
        <style>
          .box {
            display: flex;
            justify-content: center;
            align-items: center;
            width: 200px;
            height: 200px;
            background-color: orange;
          }

          .box span {
            width: 100px;
            height: 100px;
            background-color: red;
          }
        </style>
      </head>
      <body>
        <div class="box">
          <span></span>
        </div>
        <script>
          // 1.获取元素
          const spanEl = document.querySelector('span');
          const divEl = document.querySelector('div');
          const bodyEl = document.body;

          // 2.绑定点击事件
          spanEl.onclick = function () {
            console.log('span元素发生了点击~');
          };
          divEl.onclick = function () {
            console.log('div元素发生了点击~');
          };
          bodyEl.onclick = function () {
            console.log('body元素发生了点击~');
          };

          // 默认情况下是事件冒泡
          // spanEl.addEventListener("click", function() {
          //   console.log("span元素发生了点击~冒泡")
          // })
          // divEl.addEventListener("click", function() {
          //   console.log("div元素发生了点击~冒泡")
          // })
          // bodyEl.addEventListener("click", function() {
          //   console.log("body元素发生了点击~冒泡")
          // })

          // 设置希望监听事件捕获的过程
          spanEl.addEventListener("click", function() {
            console.log("span元素发生了点击~捕获")
          }, true)
          divEl.addEventListener("click", function() {
            console.log("div元素发生了点击~捕获")
          }, true)
          bodyEl.addEventListener("click", function() {
            console.log("body元素发生了点击~捕获")
          }, true)
        </script>
      </body>
    </html>
效果
03 - 存在两种事件流的原因
● 早期浏览器开发时,IE和Netsape采用了完全相反的事件流来对事件进行传递
● IE采用了事件冒泡的方式。Netscape采用了事件捕获的方式
04 - 事件捕获和冒泡的过程
3、事件对象
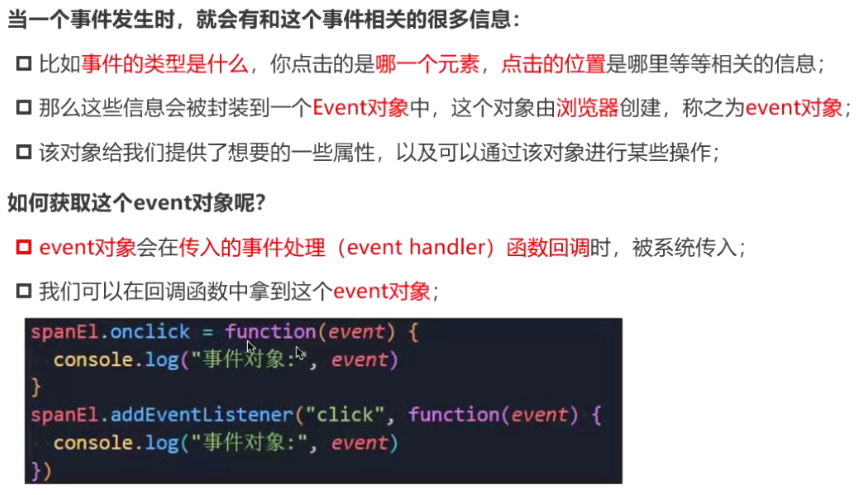
01 - 事件对象的属性 :
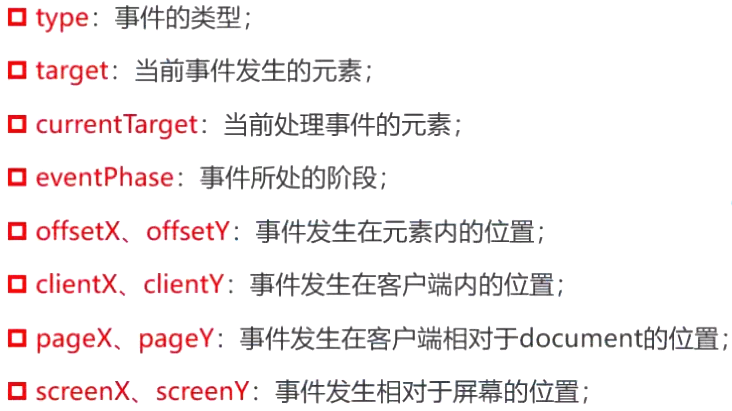
重要:
target : 点在谁身上就是谁
currentTarget : 谁绑定了事件,指谁
栗子
    <!DOCTYPE html>
    <html lang="en">
      <head>
        <meta charset="UTF-8" />
        <meta http-equiv="X-UA-Compatible" content="IE=edge" />
        <meta name="viewport" content="width=device-width, initial-scale=1.0" />
        <title>Document</title>
        <style>
          .box {
            display: flex;
            width: 200px;
            height: 200px;
            background-color: orange;
          }
          span {
            width: 100px;
            height: 100px;
            background-color: #f00;
          }
        </style>
      </head>
      <body>
        <div class="box">
          <span class="btn"> </span>
        </div>
        <script>
          var divEl = document.querySelector('div');
          var btnEl = document.querySelector('.btn');

          divEl.onclick = function (event) {
            console.log('target', event.target);
            console.log('currentTarget', event.currentTarget);
            console.log(event.currentTarget === event.target);
          };
        </script>
      </body>
    </html>
效果
02 - 事件对象的方法
preventDefault : 阻止默认事件
    <body>
      <a href="http://www.baidu.com">百度一下</a>

      <script>
        const aEl = document.querySelector("a")
        aEl.onclick = function(event) {
          console.log("a元素发生了点击~")
          // 阻止之后不会进行页面跳转
          event.preventDefault()
        }
      </script>
    </body>
stopPropagation : 阻止传递事件 ( 冒泡或者捕获都可以阻止 )
    <body>
      <div class="box">
        <span>
          <button>按钮</button>
        </span>
      </div>

      <script>
        const btnEl = document.querySelector("button")
        const spanEl = document.querySelector("span")
        const divEl = document.querySelector("div")

        divEl.addEventListener("click", function(event) {
          console.log("div的事件捕获监听~")
          // event.stopPropagation()
        }, true)
        spanEl.addEventListener("click", function() {
          console.log("span的事件捕获监听~")
        }, true)
        btnEl.addEventListener("click", function(event) {
          console.log("button的事件捕获监听~")
          // event.stopPropagation()
        }, true)

        divEl.addEventListener("click", function() {
          console.log("div的事件冒泡监听~")
        })
        spanEl.addEventListener("click", function(event) {
          console.log("span的事件冒泡监听~")
          event.stopPropagation()
        })
        btnEl.addEventListener("click", function() {
          console.log("button的事件冒泡监听~")
        })
      </script>
    </body>
4、事件处理函数中的this
内部的this指向绑定该函数的对象
    <body>
      <div>
        <button>按钮</button>
      </div>

      <script>
        const btnEl = document.querySelector("button")
        const divEl = document.querySelector("div")

        // 内部的this指向绑定该函数的对象   addEventListener 也是一样
        divEl.onclick = function(event) {
          console.log(this)
          console.log(event.currentTarget)
          console.log(divEl)
          console.log(this === divEl)
        }
      </script>
    </body>
5、事件处理方法
01 - addEventListener
02 - removeEventListener
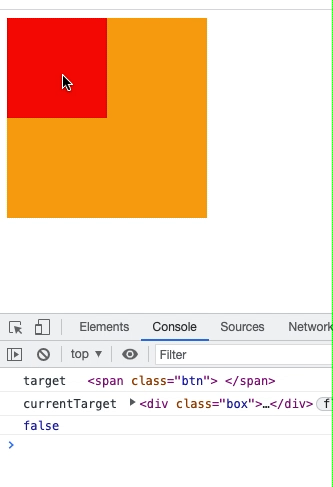
栗子
      <body>
        <button>按钮</button>

        <script>
          const btnEl = document.querySelector('button');
          const foo = function () {
            console.log('监听到按钮的点击');
          };
          btnEl.addEventListener('click', foo);

          // 过5s钟后, 将这个事件监听移除掉
          setTimeout(function () {
            btnEl.removeEventListener('click', foo);
          }, 3000);

          // ----------------------------------
          // 这种做法是无法移除的
          // btnEl.addEventListener('click', function () {
          //   console.log('btn监听的处理函数~');
          // });
          // setTimeout(function () {
          //   btnEl.removeEventListener('click', function () {});
          // }, 5000);
        </script>
      </body>
效果
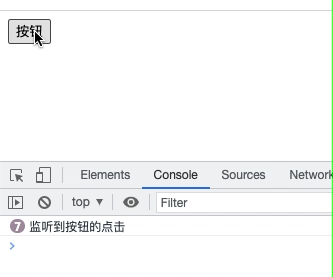
03 - dispatchEvent
栗子
      <body>
        <script>
          // eventtarget就可以实现类似于事件总线的效果
          window.addEventListener('哈哈哈哈哈', function () {
            console.log('监听到哈哈哈哈哈的呼唤~');
          });

          setTimeout(function () {
            // 派发了事件后,就可以监听到了
            window.dispatchEvent(new Event('哈哈哈哈哈'));
          }, 2000);
        </script>
      </body>
效果
6、事件委托

01 - 栗子 一
代码
<!DOCTYPE html>
<html lang="en">
<head>
<meta charset="UTF-8" />
<meta http-equiv="X-UA-Compatible" content="IE=edge" />
<meta name="viewport" content="width=device-width, initial-scale=1.0" />
<title>Document</title>
<style>
.active {
color: red;
font-size: 20px;
background-color: orange;
}
</style>
</head>
<body>
<ul>
<li>1</li>
<li>2</li>
<li>3</li>
<li>4</li>
<li>5</li>
<li>6</li>
<li>7</li>
<li>8</li>
<li>9</li>
<li>10</li>
</ul>
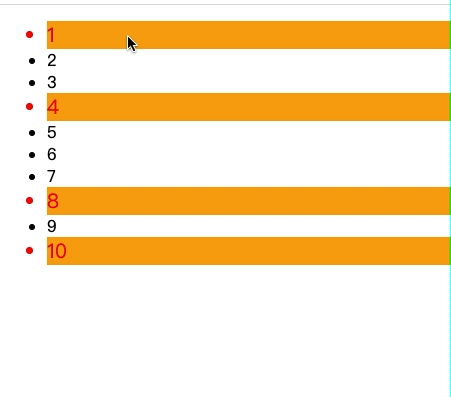
<script>
// 1.每一个li都监听自己的点击, 并且有自己的处理函数(自己的函数)
// const liEls = document.querySelectorAll("li")
// for (let liEl of liEls) {
// // 监听点击
// liEl.onclick = function(event) {
// event.currentTarget.classList.add("active")
// }
// }
// 2.统一在ul中监听。 使用事件委托
const ulEl = document.querySelector('ul');
ulEl.onclick = function (event) {
console.log('点击了某一个li', event.target);
event.target.classList.add('active');
};
</script>
</body>
</html>
效果
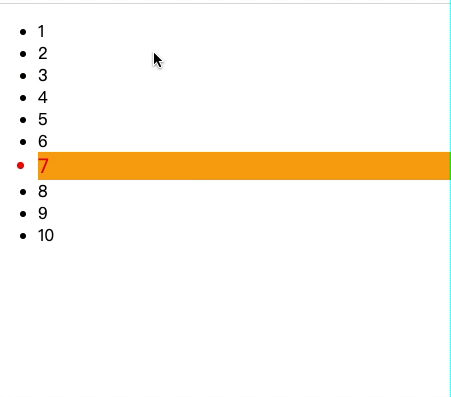
02 - 栗子 二
代码
    <!DOCTYPE html>
    <html lang="en">
      <head>
        <meta charset="UTF-8" />
        <meta http-equiv="X-UA-Compatible" content="IE=edge" />
        <meta name="viewport" content="width=device-width, initial-scale=1.0" />
        <title>Document</title>
        <style>
          .active {
            color: red;
            font-size: 20px;
            background-color: orange;
          }
        </style>
      </head>
      <body>
        <ul>
          <li>1</li>
          <li>2</li>
          <li>3</li>
          <li>4</li>
          <li>5</li>
          <li>6</li>
          <li>7</li>
          <li>8</li>
          <li>9</li>
          <li>10</li>
        </ul>
        <script>
          const ulEl = document.querySelector('ul');

          let activeLiEl = null;
          ulEl.onclick = function (event) {
            // 1.将之前的active移除掉  ---------------------

            // 1.1 使用for循环
            // for (let i = 0; i < ulEl.children.length; i++) {
            //   const liEl = ulEl.children[i]
            //   if (liEl.classList.contains("active")) {
            //     liEl.classList.remove("active")
            //   }
            // }

            // 1.2 找到active的li, 移除掉active
            // const activeLiEl = ulEl.querySelector(".active")
            // if (activeLiEl) {
            //   activeLiEl.classList.remove("active")
            // }

            // 1.3.1 变量记录的方式,如果有记录,移除
            if (activeLiEl) {
              activeLiEl.classList.remove('active');
            }

            // 2.给点击的元素添加active    ---------------------
            event.target.classList.add('active');

            // 1.3.2 记录最新的active对应的li
            activeLiEl = event.target;
          };
        </script>
      </body>
    </html>
效果
© 著作权归作者所有
发表评论


