


 点击刷新
点击刷新

一、React 介绍
1. 产生背景:
◆ React 是用于构建用户界面的 JavaScript 库,起源于 Facebook 的内部项目,该公司对市场上所有 JavaScript MVC框架都不满意,决定自行开发一套,用于架设 Instagram 的网站,于2013年5月开源。
◆ 由于 React 的设计思想极其独特,属于革命性创新,性能出众,代码逻辑却非常简单。所以,越来越多的人开始关注和使用,认为它可能是将来 Web 开发的主流工具。
◆ 这个项目本身也越滚越大,从最早的UI引擎变成了一整套前后端通吃的 Web App解决方案。衍生的 React Native 项目,目标更是宏伟,希望用写 Web App 的方式去写 Native App。如果能够实现,整个互联网行业都会被颠覆,因为同一组人只需要写一次UI ,就能同时运行在服务器、浏览器和手机。
2. 用途:
◆ React 主要用于构建UI。你可以在 React 里传递多种类型的参数,如声明代码,帮助你渲染出UI、也可以是静态的 HTML DOM 元素、也可以传递动态变量、甚至是可交互的应用组件。
3. 特点:
◆ 声明式设计:React 使创建交互式 UI 变得轻而易举。为你应用的每一个状态设计简洁的视图,当数据变动时 React 能高效更新并渲染合适的组件。
◆ 组件化: 构建管理自身状态的封装组件,然后对其组合以构成复杂的 UI。
◆ 高效:React 通过对 DOM 的模拟(虚拟 DOM 树),最大限度地减少与 DOM 的交互(只修改不一样的部分)
◆ 灵活:无论你现在使用什么技术栈,在无需重写现有代码的前提下,通过引入 React 来开发新功能。
4. JSX:
JSX 是 React 中的一种语言,会被 Babel 编译成标准 JavaScript
二、React 环境配置
1. 配置环境:
◆ 终端环境(三选一): Git (推荐)、 window的PowerShell 、 VS Code中按下 Ctrl+ `
◆ Node.js环境
2. 创建 React App:
选定一个目录执行如下操作,推荐使用 React 官方的脚手架 create-react-app 创建项目
◆ 创建 React 项目:npx create-react-app project-name --typescript,project-name 为项目名称,–typescript 代表是否使用TS
◆ 到项目文件夹下:cd project-name
◆ 启动 React 项目:npm start
3. VS Code插件:
◆ Simple React Snippets:自动补全一些 React 常用代码
◆ Prettier - Code formatter:代码格式化与高亮
4. 第三方库(可选):
bootstrap:
◆ 安装:npm i bootstrap
◆ 引入CSS:import ‘bootstrap/dist/css/bootstrap.css’;
◆ 引入JS:import “bootstrap/dist/js/bootstrap.js”;
三、组件(component)
1. 引入组件库:
使用 Simple React Snippets 插件快捷生成 imrc + Tab
import React, { Component } from "react";
2. JSX简介 :
◆ 嵌入表达式:{},可以在大括号内放置任何有效的 JavaScript 表达式(变量)
const name = 'Josh Perez';
const element = <h1>Hello, {name}</h1>;
注意:
◆ 自闭标签必须以斜杠结尾,例如
◆ 属性和方法必须采用驼峰式,例如 onClick
◆ 添加CSS类使用 className,因为 class 是 Javascript 里的关键字
◆ CSS属性中用 - 链接的改为驼峰式,例如 background-color -> backgroundColor
3. 类组件:
使用 Simple React Snippets 插件快捷生成 cc + Tab
class Welcome extends React.Component {
  render() {
    return <h1>Hello, {this.props.name}</h1>;
  }
}
4. 函数式组件:
使用 Simple React Snippets 插件快捷生成 sfc + Tab
function Welcome(props) {
  return <h1>Hello, {props.name}</h1>;
}
5. 使用组件:
render() 函数最终只能返回一个标签,当子节点数量大于1时,可以用 <div> 或<React.Fragment> 将其括起来
import React, { Component } from "react"; //引入组件库
import TestCard1 from "../components/TestCard1"; //引入写好的组件
import TestCard2 from "../components/TestCard2"; //引入写好的组件
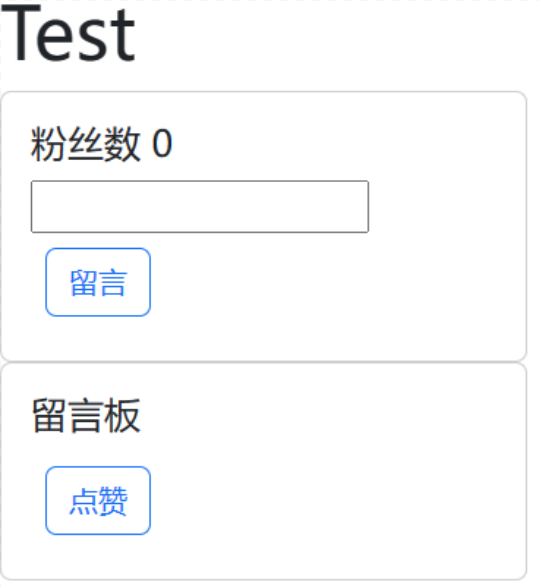
class Test extends React.Component { //类组件
render() {
return (
<React.Fragment>
<h1>Test</h1>
<TestCard1 /> //使用写好的组件
<TestCard2 /> //使用写好的组件
</React.Fragment>
);
}
}
export default Test;
效果如下:
四、渲染列表(map)
1. Key 属性:
◆ 每个元素需要具有唯一的 key 属性,用来帮助 React 快速找到被修改的 DOM 元素,通常使用数据中的 id 来作为元素的 key,即一个独一无二的字符串
◆ 当元素没有确定 id 的时候,可以使用元素索引 index 作为 key,如果列表项目的顺序可能会变化,不建议使用索引来用作 key 值,因为这样做会导致性能变差,还可能引起组件状态的问题。
2. 示例:
function NumberList(props) {
  const numbers = props.numbers;
  const listItems = numbers.map((number) =>	//将 numbers 中的每一个数字 number 转化成一个列表 li
    <li key={number.toString()}>
      {number}
    </li>
  );
  return (
    <ul>{listItems}</ul>
  );
}

const numbers = [1, 2, 3, 4, 5];
const root = ReactDOM.createRoot(document.getElementById('root'));
root.render(<NumberList numbers={numbers} />);
五、数据传输(state、props)
1. 单向数据流:
◆ state 中的数据相当于类中的私有变量,可以通过 props(传递数据)、 props.children (传递子节点)向下传递到子组件中,但是只能在当前组件的内部通过 setState() 函数修改,不能在子组件内修改
◆ 子组件中不应该存在任何修改 state 数据的函数,应提升至父组件,再通过 props 调用
◆ 多个组件共用的数据应存放到最近公共祖先的 state 中
◆ 每次调用 setState() 函数后,会重新调用 render() 函数,用来修改内存中的虚拟 DOM 树,然后修改实际 DOM 树中不同步的节点。
2. 事件处理:
◆ 绑定事件函数:使用 bind() 将函数绑定,或者将函数定义为箭头函数
◆ 阻止默认行为:preventDefault()
    function Form() {
      function handleSubmit(e) {
        e.preventDefault();
        console.log('You clicked submit.');
      }

      return (
        <form onSubmit={handleSubmit}>
          <button type="submit">Submit</button>
        </form>
      );
    }
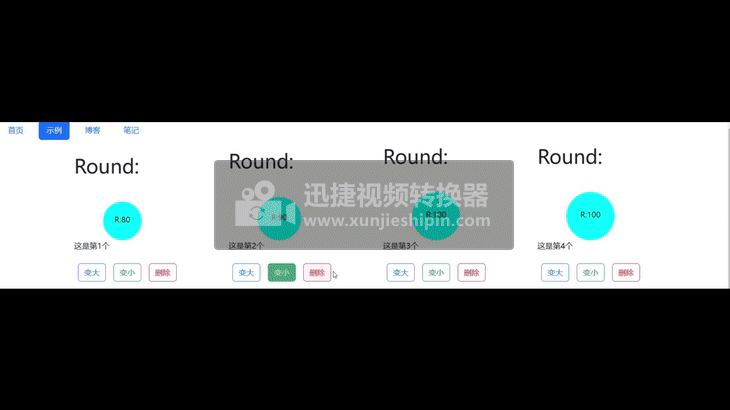
3. 示例:
通过子组件 Round(圆球)和父组件 Rounds(圆球组)说明
Rounds 组件:
import React, { Component } from "react";	 //引入组件库
import Round from "./Round"; 	//引入子组件圆球 Round

//定义 Rounds 组件
class Rounds extends React.Component {
  state = {									 //通过 state 定义圆球块中的私有变量
    Rounds: [
      { id: 1, r: 100 },
      { id: 2, r: 100 },
      { id: 3, r: 100 },
      { id: 4, r: 100 },
    ],
  };
  //使用 bind() 将函数绑定,或者将函数定义为箭头函数
  //this.increaseRoundRadius = this.increaseRoundRadius.bind(this);
  increaseRoundRadius = (roundId, step) => { //定义变大函数
    const Rounds = this.state.Rounds;
    for (let round of Rounds) {
      if (round.id === roundId) {
        round.r += step;
      }
    }
    this.setState({	//修改 state 中的数据需要通过 setState 方法,不能直接修改
      Rounds,  // ES6 语法糖,当属性和值一样时可以简写,参考文章 Javascript(上)
    });
  };

  decreaseRoundRadius = (roundId, step) => { //定义变小函数
    const Rounds = this.state.Rounds;
    for (let round of Rounds) {
      if (round.id === roundId) {
        round.r -= step;
      }
    }
    this.setState({ //修改 state 中的数据需要通过 setState 方法,不能直接修改
      Rounds,
    });
  };

  handleDelete = (RoundId) => { //定义删除函数
 	//filter函数,筛选数组中符合条件的元素
    const Rounds = this.state.Rounds.filter((round) => round.id !== RoundId);	//相当于删除传入的 id 元素
    this.setState({ Rounds: Rounds });	//修改 state 中的数据需要通过 setState 方法,不能直接修改
  };

  render() {
    return (
      <React.Fragment>
        <div>
          {this.state.Rounds.map((round) => (	//使用 map 渲染列表,将 State 数组Rounds 中的每一项round 渲染成如下内容
            <Round
              key={round.id}	//调用数组Rounds 中的每一项的id、r
              r={round.r}
              id={round.id}
              onDelete={this.handleDelete}	//调用方法
              increaseRadius={this.increaseRoundRadius}
              decreaseRadius={this.decreaseRoundRadius}
            >
              <h1>Round:</h1>			//传递标签给子组件
              <p>这是第{round.id}个</p>		//传递标签给子组件
            </Round>
          ))}
        </div>
      </React.Fragment>
    );
  }
}

export default Rounds;
Round 组件:
import React, { Component } from "react";  //引入组件库

//定义 Round 组件
class Round extends React.Component {
  render() {
    return (
      <React.Fragment>
        <div									//圆球块的一些样式设置,可以忽略
          style={{
            display: "inline-block",
            margin: 50,
          }}
        >

          //通过 props.children 调用父组件中 Round 内的圆球组标签 h1
          {this.props.children[0]}
          <div									//圆球的一些样式设置,可以忽略
            style={{
              margin: "50px 50px 0px 60px",
              height: this.props.r,
              width: this.props.r,
              borderRadius: "50%",
              backgroundColor: "aqua",
              textAlign: "center",
              lineHeight: this.props.r / 17,
            }}
          >

          //通过 props 调用父组件中 Round 的 r 属性,进而调用圆球组 state 中的数据 r
          {`R:${this.props.r}`}
          </div>

          //通过 props.children 调用父组件中 Round 内的圆球组标签 p
          {this.props.children[1]}

          //通过 props 调用父组件中 Round 的 increaseRadius 属性,进而调用圆球组中的变大函数 increaseRadius
          <button
            onClick={() => this.props.increaseRadius(this.props.id, 10)} //定义点击事件,使用箭头函数传参数
            className="btn btn-outline-primary m-2"
          >
            变大
          </button>

          //通过 props 调用父组件中 Round 的 decreaseRadius 属性,进而调用圆球组中的变小函数 decreaseRadius
          <button
            onClick={() => this.props.decreaseRadius(this.props.id, 10)} //定义点击事件,使用箭头函数传参数
            className="btn btn-outline-success m-2"
          >
            变小
          </button>

          //通过 props 调用父组件中 Round 的 onDelete 属性,进而调用圆球组中的删除函数 onDelete
          <button
            onClick={() => this.props.onDelete(this.props.id)}	//定义点击事件,使用箭头函数传参数
            className="btn btn-outline-danger m-2"
          >
            删除
          </button>
        </div>
      </React.Fragment>
    );
  }
}

export default Round;
效果如下:
六、生命周期
1. 生命周期方法 :
◆ 挂载(mount):componentDidMount() {},当组件第一次被渲染到 DOM 中的时候执行
◆ 更新(update):componentDidUpdate() {},当组件在 DOM 中更新的时候执行
◆ 卸载(unmount):componentWillUnmount() {},当组件从 DOM 中删除的时候执行
2. 执行顺序:
◆ Mount 周期:constructor() -> render() -> componentDidMount(),即构造、渲染、挂载
◆ Update 周期:render() -> componentDidUpdate(),即渲染、更新
◆ Unmount 周期:componentWillUnmount(),卸载
© 著作权归作者所有
发表评论


